
Gilding and Housing
- Mar 15, 2019
- 3 min read

Today I mostly just did detail work on my master copy in preparation for adding the gilding next week. I added a few more ground layers to the frame and dividers to ensure that it will provide enough cushion to my guiding when I burnish (rub it really hard so that it gets really shiny).
Between the ground layer and the gold leaf, there is another layer called bole. It's a red clay that adds cushion as well as giving your gold leaf warm undertones. Or should I say usually warm undertones. During the Renaissance, red bole was most common, but now people use all sorts of bole - yellow, black, blue, and even green. To the right you can see how the bole looks before it's covered in gilding.
Even though it's a clay, bole tends to seep all over the place, so I made small incisions in the ground layer to keep the bole just in the areas I want to gild.


The decorative beads that I added to the corners stuck out a lot and weren't very stable, so we decided to fill in the area around. We used a paste that is basically the same thing as the ground layer mixture (animal skin glue, chalk), but with much more chalk in it so that it is thicker and can hold its shape better. This paste is also used to fill cracks in frames etc., so you may see me use this again when I finish the frame reconstruction from the other week.
The trick with this paste is that, like the gesso, it has to stay warm or else it will set too fast because the rabbit skin glue will coagulate if it is below blood temperature. Normally, you should be able to hold it in your hand and work with it, but I have very cold hands. So you can see here that my fill job is a little lumpy and not as smooth as it could be.
On the side, Nina is working on designing some heat tools for conservators, so I'll have to convince her to make me some special gloves that can help me keep paste warm while I'm working on it.
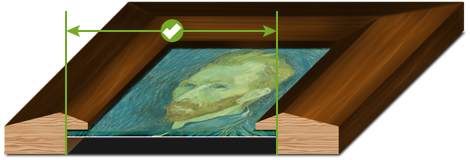
Nina also had me help take a new piece out of its frame. This is one of my favorite paintings I've seen in the studio so far. I think she said it's probably an impressionist piece from the 20s. I know I've already run through like three frame removals with you guys, but I wanted to include this one because I learned something new about "housing" (how the piece is held in the frame).

In the images below, you'll see little diamonds sticking out of the frame. These are called glazing points. You may have heard of them before in the context of windows. They help hold the backing board and painting into the frame. They come in all shapes and sizes and can be inserted with a hammer or even a glazing gun.


On the front, the painting is held in place by a frame rabbet. The rabbet covers the edges of the painting, so common conservation work is fixing the areas where the rabbet has rubbed away paint, left gilding stuck to the painting, discolored the painting, or in this case - where someone varnished the painting while it was still inside the frame, leaving the edges unvarnished.


Comments